

How Do You Get 2 Players In Paint The Town Red Level Editor
Introduction
so true
Each player knows that Level Editor in PtTR is a perfect tool used to create totally different levels with whatever mode you want.
However, when creators brainstorm editing, the majority of them face with some issues, because it might be quite tricky to start up, if y'all don't know some basics.
This guide will assistance yous meet up the level editor, it'south controls, detalising, settings and everything else that tin come in handy on the way of creating your ain map.
So, here nosotros get. I know, that in that location is an Official Level Editor Guide, but it's not updated for a Actually long fourth dimension. That's why i'k here.
Bones stuff

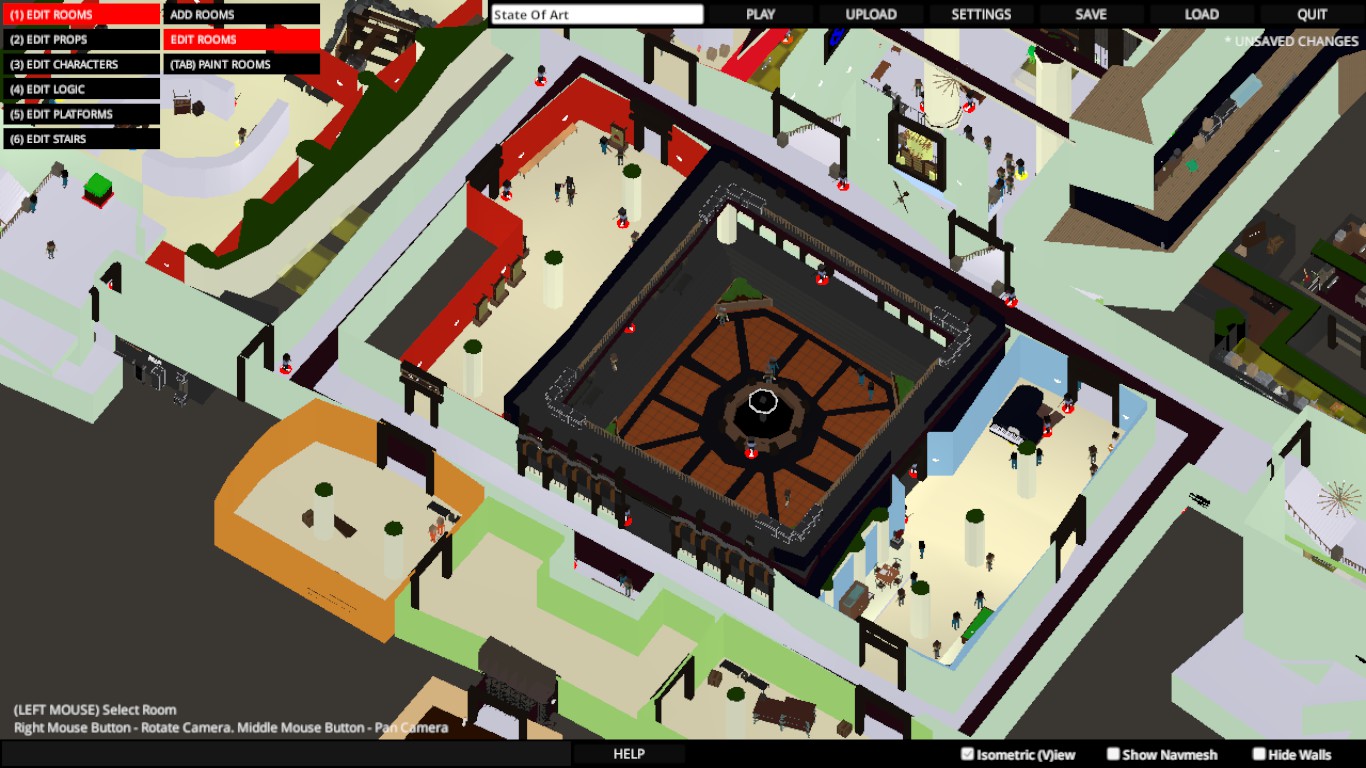
Outset of all, allow's look at the main panels and toolbars of the editor.
Our window consists of three main parts:
Editor


==========================================================================
Main Bill of fare Functions

From Left to the Correct:
==========================================================================
Controls in Paint the Town Cerise level editor are the same with other editors.
Most of effects and deportment are controlled with hotkeys.
Principal Controls
V - Camera Modes
W - Object Move Mode
E - Object rotate Mode
LMB - Select Objects
Esc - Deselect Objects
Delete or Backspace - Remove objects
Ctrl + D - Copy selected objects
Tab - Switching between options in toolbar bill of fare
M - Switch the Grid
+/- - Alter the size of grid
F5 - Fast Save
Ctrl + Z - Disengage
Ctrl +Y - Redo
Selecting Controls:
LMB - Select Object
Esc - Deselect Object
Concur & Elevate LMB - Select multiply objects
Ctrl + Clicking on the Object - add / remove an object to the selection

There are two Camera modes in PtTR Editor:
Isometric Photographic camera Tool
This camera mode allows you lot to lookout at the map from the peak. Likewise, it allows you to move fast betwixt different rooms and zoom in. To exist honest, Isometric Camera is not and then useful equally the second style.
Controls:
V - Alter camera mode
Concord RMB - Rotate Camera
Hold MMB - Pan Photographic camera
Concord RMB + WASD - Pan Photographic camera
Scroll Mouse Wheel - Zoom
==========================================================================

Gratuitous Perspective Photographic camera
Yep, that'southward what I'g talking about. This Camera manner allows you to move at each corner of the map and easely fly trough the different floors or even await at your map upside downwardly! In my stance, it's amend to work in this camera style all the time. Information technology's perfect for setting details, props and characters.
Controls:
V - Change camera fashion
Hold RMB - Rotate photographic camera
Hold RMB + WASD - gratuitous move
Hold RMB + WASD + LShift - motion faster
Scroll mouse cycle - Zoom
F - focus on selected object
Alt + RMB - movement camera around selected objects
O - Toggle & rotate axes
==========================================================================
Level Settings

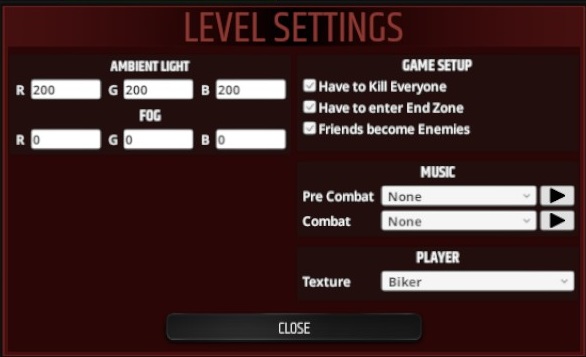
You can change some global settings in the Main Bill of fare. Select Settings bar to edit them.
Global Settings Helps y'all to upgrade your level atmosphere or edit things you have to practise to win.

And then, here it is:
Level Options Menu
============================================================================


=========================================================================
No Effects
Fog & Ambient Calorie-free effects


=========================================================================
Game Setup - these setings allows you to change some global stuff.
- Take to kill everyone - Y'all won't be able to exit the map earlier killing each enemy. If option in disabled, and so level end zone will be aviable all the time
- Have to enter End zone - you accept to enter the zone to finish the level. If choice is disabled, then your game will be finished automaticly afterward killing all of the enemies
- Friends go enemies - That'south information technology, y'all also have to kill your friends to complete the map. If option is disbled, so y'all won't accept to do it to finish the level.
=========================================================================
=========================================================================
- Biker
- Disco
- Prison house
- Pirate Cove
- Arena
Editing Rooms

To go to room editing, select on the main panel Edit Rooms bar, or press 1.
Room Editing Controls:
Click + Drag LMB on corner - Movement corner
Ctrl + Drag LMB on corner - Move room
Click LMB on wall center - Select wall for door type editing
C + Click LMB on wall center - Divide wall and add corner
X + Click LMB on corner - Delete corner
Shift + Drag LMB on wall center - Movement/Connect wall
Delete or Backspace - Delete room
As you can see from the controls list, there are 2 master parts in each room: wall centers and corners
Selected Room

========================================================================
Corners
Yous tin utilize corners to requite your room the right shape. You can add every bit many corners as you want, but
always try to have merely the nescessary ones.
Each created corner adds 1 new wall heart.
========================================================================
Wall Centers
Wall centers are used to connect rooms and add doors or remove the whole walls.
========================================================================

Room Backdrop
Other room settings are located here.
Y position (from -l to fifty) - Y position of the floor
Wall Tiptop (from 2 to 100) - the hight of walls
Ceiling & Floor options - Remove / Add Floor or Ceiling
Paint - Select a part of room to paint
Permit other room overlaps - usually you tin't brand walls of different rooms to overlaps. This is good, but yous always tin turn it off if y'all need
Describe Ceiling From Higher up - Makes Ceiling visible from all sides (basically you can come across it just from the lesser). Quite helpful If you're working with an other flooring.
========================================================================
Editing Doors

Each wall has a Wall door type. Yous can set 3 other types.
Editing Props

To go to props editing, select on the chief panel Edit Props bar, or printing 2.
Controls:
C - Add prop
Delete or Backspace - remove prop
Due west - Moving mod
Due east - Rotation mode
Ctrl + D - Re-create
==========================================================================
Editor says that there are 2 types of props. Only in my opinion, there are 6 of them (because of their unlike settings):
- Melee Weapons
- Guns
- Furniture & surround stuff
- Traps
- Lights
- Timer & Push props
Likewise you tin can select 2 other types of props: the ones with physics and the ones without information technology.
==========================================================================
When you're working with props, you have 2 modes to do information technology:
Motility Style (Printing W)
Rotate Mode (Press E)


In each mode you're working with XYZ axes, so information technology shouldn't be tricky.
==========================================================================

Weapon Properties
Can be Picked Upwardly Past Enemies - Allows to set if Everyone can use this weapon or player but.
Fixed in Place - Allows to lock your weapon and prevent it from falling down.
Unbreakable - Makes your weapon space
Guns take 2 more dissimilar properties:
Ammo (from 0 to 10 000) - Allows you to set the number of bullets in your gun
Unlimited Ammo - Makes your gun space.
Well, moving objects around probably takes almost of time in level editing, but believe me, this is worth it.
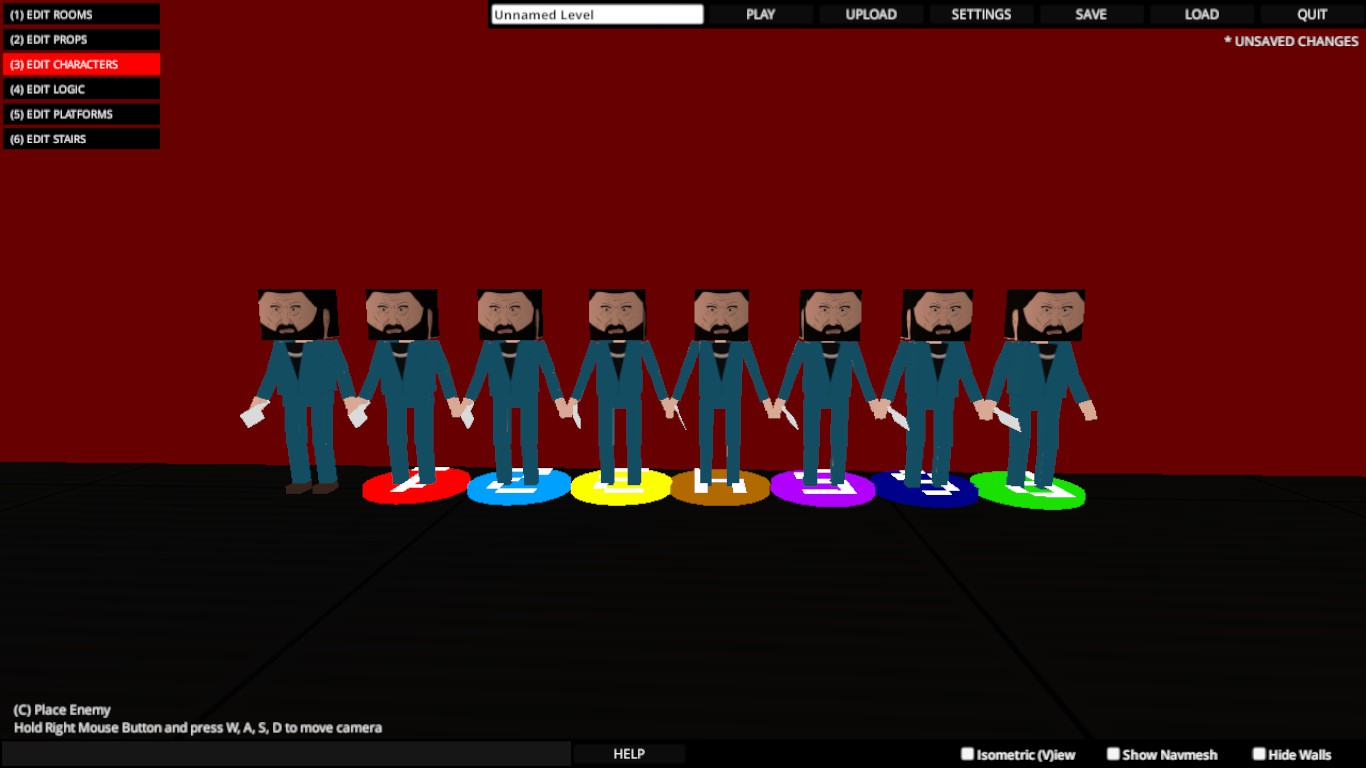
Editing Characters

Finally we reached to the most interesting part of the map creating.
To go to characters editing, select on the main console Edit Characters bar, or press 3.
Controls:
C - Identify character
Delete or Backspace - Remove character
Ctrl + D - copy selected characters

Enemy Properties
There is a huge prepare of different parameters, lets bank check this out:
Enemy Type - this parameter explains who your enemy is.
Allof the other generated backdrop depend on Enemy Type. For example, you chose Disco Katana Boss enemy blazon. That means he will have better wellness, impairment & attack speed, he'll survive the caput impairment, etc.
Appearance - that'southward how your enemy looks like. Appearance explains which texture does your enemy use.
Trunk Type - cypher to explain. For now, there are three torso types: Normal, Muscled and Large

Animation - explains what is your enemy gonna do before a fight. We'll take a walk trough all of them in the next department.
Fraction - In order for NPCs to start the fight personally with each other (or vice versa, they did non start, if they are in the same team), they have to be in unlike fractions.
For now, at that place are 8 fractions (including Player fraction (friendly characters) and None fraction)
========================================================================
Personal Skills:
Attacks Player Kickoff - Enemy will attack players immediately when the combat starts.
Tin can exist knocked downward - explains if your enemy can fall down subsequently a KO kick or non.
Survives encephalon harm - your enemies won't dice after a fatal headsot
Drops weapon on knockdown - if enemy falls, he drops his weapon
Can pick up weapons - zip to explain
Has weapon - eplains if enemy starts with his own weapon in his hands or without whatsoever.
Has Shield - same with a previous skill
========================================================================

Other parameters:
Also, each character has such properties equally Health, Damage and Set on Speed.
Wellness
(From 0 to 50)
If y'all set 0, then your enemy volition be dead
. In this case,
combat will showtime immediately, too. If you set l, then practiced luckin killing this person (for exmple, Disco Katana Boss has but 15 health points).
Attack Speed
(From 0 to 5)
Well, this parameter is not and then important. If you set up 0, and then your enemies won't assail you at all.
Attack Damage
(From 0 to 15)
If you fix 0, then enemy attacks won't hurt you lot, but notwithstanding might take some of your special powers. if you lot set 15, then enemies volition i shot you.
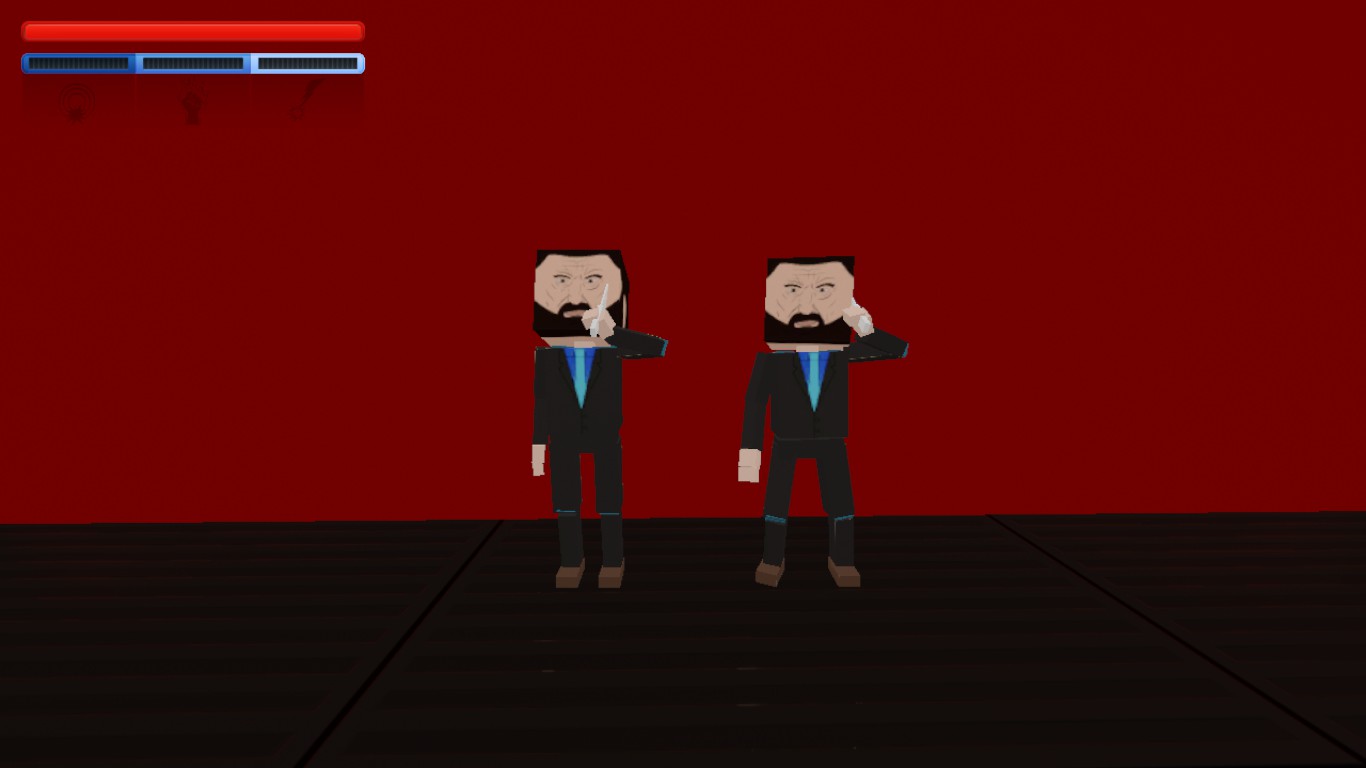
Animation

When enemies have animation, the level looks much more lively and interesting. However, yous should remember that it's not that easy to find the desired option, considering there are a lot of them in the Animation tab.
In this department, we'll look at each animation so you can easily find what you lot need.
The Table
Default Idle

BarbellIdle

Bar Lean

BarLeanDrink / BarLeanDrinkRight

BenchPress

Bodyguard

BossChairSit / ChairSit

CookChop

CookSniff

CookWait

CouchSit / CouchSitSmoke

DansingBasic / DansingIntolt / DancingTravolta

DJ

Drums

Fetal

GuardBeating

Guitar / Guitar 2

Pimp

PoolIdle / PoolIdleComplain / PoolLineUp

RailLean

StandDrink / StandDrinkDrunk_ClayMug
*Glitched animation, don't use it* StoolSit / Stoolsit

TableLeanDrinkLeft_Mug / TableLeanDrinkRight_Bottle

ThreatenChokeDagger / ThreatenChoked

UprightSit

TradeMill

WallLean / WallLeanDrinkCoctail / WallLeanSmoke

Enemy Texture / Atributic / CustomSkills

In add-on to Health, attack power, animations and textures, each character can take his own accessories, according to their parameters.
Example: The boxer does not accept headphones. But if his type is DJ, then he will have headphones
The Tabular array
No Custom trunk types

Boxer

Chef

PrisonerNaked

DJ

Disco Pimp

Pirate Captain

Blackbeard

Disco Katana Boss (This enemy type doesn't give any accessories, simply your enemy will walk slower and have unbreakable basic)
Editing Logic

To become to Logic editing, select on the main panel Edit Logic bar, or press four.
Start of all, Logic is almost zones. You can create three unlike zone types:
1) Level Stop Zone
2) Starts General Combat Zone
3) Inactive Zone
Zones are created in the same way every bit rooms. That ways they use the aforementioned controls:
Click + Drag LMB on corner - Motility corner
Ctrl + Elevate LMB on corner - Motion zone
C + Click LMB on zone wall center - Split wall and add corner
X + Click LMB on corner - Delete corner
Delete or Backspace - Delete zone


Properties:
Y position - Meridian of the zone above the floor level
Height - the height of the walls of the zone
Starts General Combat - If the parameter is on, then if you'll trigger enemies once you entered information technology.
Level End Zone - the zone will be the exit from the level. Information technology volition appear when all enemies are killed. Y'all tin can have several such zones using this type.
Trigger On - Logic effect will be triggered on inbound or exiting the zone. And so you need to brand a choise.
Logic Effect - At that place are 3 types of logic effect: Toggle (switchs between on & off for lights and traps), Turn on (only activates) or Plough off (just deactivates).
Logic Works Once - If parameter is active, and so your logic upshot will work only once. For example, if your zone turns on the trap, trap does it'due south job and turns off, then you won't be able to turn it on by entering a zone again.
If the cheque box is not checked for whatever of the parameters, the zone will be inactive. However, it volition still exist possible to tie the characters to it.

You lot tin can link characters to the zones, so that they won't start fighting befor getting triggered past player attack or entering the zone.
Linking characters:

If you desire to connect your enemy to whatsoever zone, then y'all need to:
1) Cull the zone you need (selection Edit Zones option and click on the zone)
ii) Press T
three) Choose an enemy / trap / lights you need and click on it.
Making a Path

Also, y'all can create enemu paths and so that your characters may motion before getting triggered.
If y'all want to make a path, and then you need to:
1) Create some Path Marks (located in Edit Props --> Props --> Others)
2) Get to Edit Logic option
3) Link your grapheme to the first mark (by pressing T)
four) Link other marks to the first mark (past pressing T)

Well, these things take their custom settings, too.
Total Properties:

Traps
Timer Based - If parameter is turned on, then your trap will turn on in perions. If parameter is turned off, so your volition exist triggered once someone comes close enough to it.
Play Sounds - If parameter is turned off, then your trap will work silently.
Active TIme - The fourth dimension your trap stays active
Inactive Time - The Fourth dimension your trap stays inactive
Inactive Progress (from 0 to 1) - If you set ane, then your trap will exist turned on right from the level beginning, so y'all don't take to enter whatsoever zones to turn information technology on.

Timer
Well, things here are pretty obvious, you know.
Timer also may exist used to turn off the lights from the beginning by simply setting maximal Frequency.
And also you lot may use information technology for creating waves of enemies.
Button:
You may find button properties if you click on it while being in Edit Logic mode. 
Can Unpress - an counterpart to "logic works in one case"
Custom Paint

You can apply pigment part to change a colour of your Rooms, Platforms or Stairs past only picking a color you need. But also you may use Custom Pigment part to create different colors which can't be found in a main list.
You can switch between two Paint types simply by using arrows.


Color set panel:

Yous can selection the color you desire past using a palete from the left side of color list. You can apply RGB color picker to get different grey colors or other ones.
Too, you may choice different Specular & Smoothness parameters to get other cool textures similar mirrors:
These cubes use the aforementioned colour only different Specular and Smoothness

Editing Platforms

To go to platform editing, select on the main panel Edit Platforms bar, or press five.
Controls:
LMB on the corner + Drag - Move the corner
C + LMB on the center of the wall - Create a new corner in the wall (dissever it into 2 parts)
Shift + LMB on the center of the wall + Drag - move the unabridged wall
Ctrl + LMB on the corner + Drag - Move the whole platform
Ten + LMB on the corner - Remove the corner
Delete / Backspace - Remove the platform
First of all, information technology is worth saying that editing platforms allows yous to add new furniture and structures to the game.
So, the platform is a "whole piece" of textures that can accept almost whatsoever class, depending on what you practise with it.


Properties:
Platforms are painted and edited in the same way every bit the rooms.
The platforms as well take corners and centers of side walls. To give the platform the necessary shape, you tin can tighten and stretch it in corners and add new ones.
Y position is responsible for the height of the platform above the floor level.
Tiptop is responsible for the platform's own peak.
Editing Stairs

To go to stairs editing, select on the main panel Edit Stairs bar, or press half-dozen.
Controls:
LMB - Create staircase
W - Move staircase
E - Rotate staircase
Delete / Backspace - remove staircase
Stairs are needed to connect dissimilar floors with each other. However, you can observe many other uses for stairs.
For example, stairs may be used for creating stands, roofs of buildings or grassy hills


Properties:
Rotation - the plough (in degrees). I practise not advise you to use this parameter, since it is much easier to rotate the ladder with the mouse and E
Height - the superlative of the stairs.
Depth - top and length of the stairs
Width - Width of the stairs
Open Underneath - adds / removes the sides of your stairs. If it's turned on, so the stairs will have simply steps, and yous can become identify something else nether information technology. If information technology's turned off, then the unabridged cake of the ladder volition exist a continuous monolith.
Painting stairs is identical to painting rooms and platforms.
Bonus Section

Here nosotros'll be talking about some tips & tricks yous may use during your creation!
============================================================================
Improve Preview Images
Maan, these arms! >:(
Much Ameliorate!


Y'all can easely make your map more attractive in the workshop if you upload a preview image without these fists, bragh.
You lot can simply do information technology: Take a small melee weapon similar a pool ball. So, printing LMB and take your screenshot while your melee is out of the screen. Easy.
============================================================================
Creating dissimilar writings

For now, y'all can create signs only by using different properties. If you desire to make a sign at your map, then you lot should employ pool balls, because they are small-scale enough to write different words.
I strongly advice you to write on the floor, because it's much easier to write in XY axes and copy your symbols, than write in XYZ.
Subsequently that, but select your writings and put it at the identify you need.
=========================================================================
Put Animations in a good use!
Improvise with animations, and then you that you e'er tin can show people something new!
poor examples:


==========================================================================
Other Helpful Guides:
http://steamcommunity.com/sharedfiles/filedetails/?id=860922469
http://steamcommunity.com/sharedfiles/filedetails/?id=1105618252
Optimisation

If you don't want to face up with lags after creating your map, and so you should follow in that location advices
i) The number of enemies on the map should not exceed 60-70 people.
two) If that's possible, try not to employ "heavy" lighting, such as disco brawl or LEDs. They take a lot of FPS, endeavor to do without them.
Also,
add a lot of lights in one place - it causes awful lags.
three) Do non brand besides narrow passes and also pocket-sized rooms on your map.
4) The nigh "heavy" object are, oddly plenty, platforms. And the more than of them, the worse. Use them but if that is necessary.
5) Approach level creation seriously. Do non litter the workshop with actress rubbish, it's already enough
Uploading to a Workshop


========================================================================
Y'all need to follow some rules to upload your level:
1) At that place Shouldn't be any unsaved changes.
ii) You must play trough and consummate the level by yourself.
iii) Yous need to make a preview screenshot for your map in the workshop (press F8 while playing)
iv) Your level'due south name has to exist unique
5) Your level shouldn't exist the same with already existing ane.
You'll be able to upload your map afterwards all of these rules are met.

Source: https://steamcommunity.com/sharedfiles/filedetails/?id=1086263111
Posted by: frasierpree1974.blogspot.com
0 Response to "How Do You Get 2 Players In Paint The Town Red Level Editor"
Post a Comment